
BFM Crypto brings you a tutorial to learn how to transfer your cryptocurrencies from cryptocurrency exchange to cold wallet step by step.
The collapse of the FTX platform has made many users consider the importance of owning their cryptocurrency (following the adage “not your keys, not your coins”). Have you bought cryptocurrency on a platform and want to keep it safe in the wallet? BFM Crypto has produced a tutorial to teach you how to transfer your cryptocurrencies from an exchange (such as Binance or Coinbase…) to a cold wallet also called a “cold wallet” (Ledger, Trezor…). Tutorial developed with the assistance of Sébastien Leguell, Founder of Media around the block.
As a reminder, a cold wallet allows the user’s private key to be kept outside the network (computer, phone). But it also makes it possible for users to perform transactions (exchanges on decentralized platforms, send cryptocurrencies, buy NFTs) when connected to a network and used with a software broker.
Here we will test transferring a certain amount of Bitcoin cryptocurrency from Binance (the first cryptocurrency exchange) to the French Ledger Rhino cold wallet.
With a few manipulations, this process will remain the same between another platform and another cold wallet. What changes will be above all the characteristics of the platforms and cold wallets (transaction fees, minimum transferable amount, software installation, etc.).
1. Set up your ledger portfolio
Before transferring your cryptocurrencies, you will first need to configure your ledger wallet while setting up a so-called “Ledger Live” space on your computer.
- Configure your ledger portfolio
You must first download the space called Ledger Live. Make sure your computer has enough capacity to host it.
Next, you will have to configure your Ledger wallet (it’s best to buy a new one, for obvious security reasons as BFM Crypto showed you here). There are various types on sale, the first to be marketed as USB keys.
Advice :
- Take the time you need (at least 30 minutes)
- Isolate yourself
- Follow the step-by-step procedure outlined by Ledger to perform the configuration
Among the critical steps:
– Choose a secret PIN that will protect access to your wallet. You will be prompted each time you launch your wallet. And as a reminder, it always stays “off the grid” even when it’s on.
– Next, the ledger wallet will generate a recovery phrase, which is a list of 24 words. You will need to write these 24 words down in order on paper (or other medium) and keep this list in a safe place out of sight (don’t take pictures and don’t email them to each other or even type them on his computer due to hacks).
Important: This list saves your private key(s): if you lose it, you lose access to your encryption.
- Create “accounts” in your ledger
Now, you will have to install the blockchains and create accounts linked to the cryptocurrencies stored on these blockchains.
Here are two steps:
- “Install” the blockchain of your choice
- Then “Add Account”: here you will have to choose the cryptocurrency you have purchased (here, we will add the cryptocurrency bitcoin and the account associated with it “Bitcoin 1”, you will find a picture of it later in the tutorial).
Example: If I want to transfer bitcoins to my ledger, I would have to “Install” the Bitcoin blockchain and then “Add account” by selecting the bitcoin cryptocurrency in Ledger Live (all validations are done for your ledger wallet, And it will be every time Ledger is guided.)
You can create as many accounts as cryptocurrencies (“Bitcoin” account for bitcoin crypto, “Ethereum” account for ethers etc.)
Each account will generate a public address where you can deposit your cryptocurrencies from a platform. In other words, these public addresses should be referred to Binance in a timely manner.
The global address looks like a string of letters and numbers like this:
2A1xyzeTBFMCrypto65FRD78xddX
2. Transfer your crypto from Binance to Ledger
- Preparing to make a withdrawal on Binance
If this is your first time making a transfer, it is best to transfer a small amount first (minimum is 0.001 BTC on Binance) to get a feel of the procedure, before making larger transfers.
To make the transfer, you will need to open your Ledger Live, launch your Ledger wallet, and open your Binance account.
We will browse the Binance website. To make your transfers as secure as possible, it is best to install a two-factor authentication procedure called 2FA on Binance. The step-by-step installation process is detailed by Sébastien Leguell here. 2FA authentication will be performed before each transfer for additional user security.
Once you are logged into your Binance account, go to your Dashboard and click on Instant Wallet (Deposits and Withdrawals). You will see your balance and all purchased cryptocurrencies.

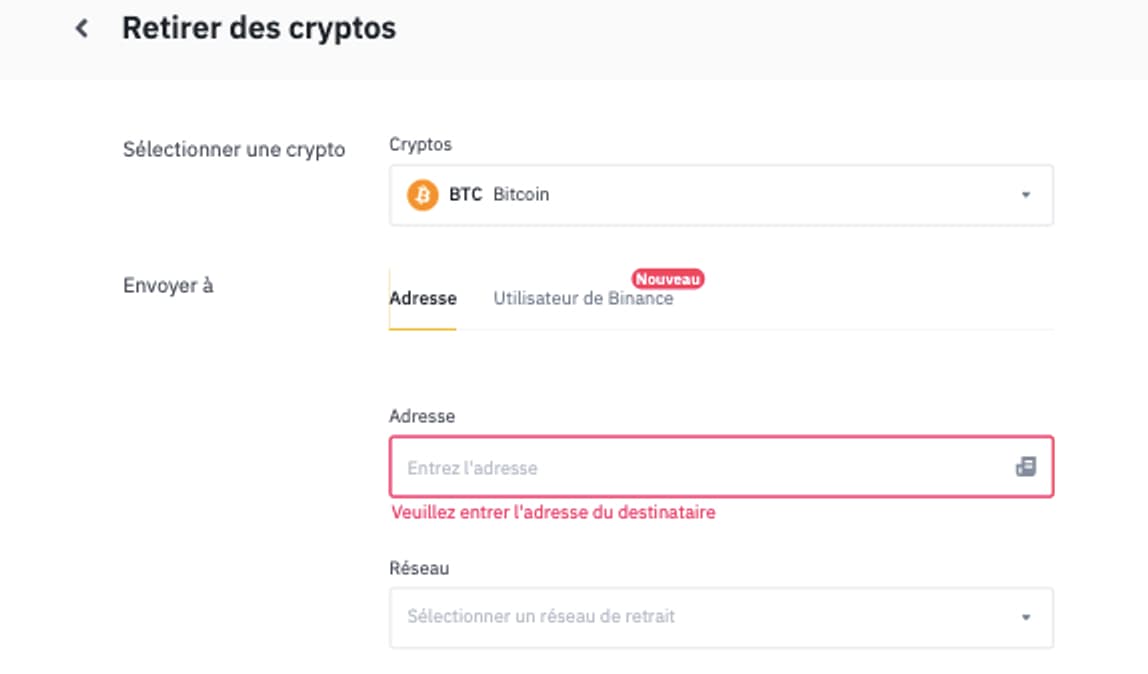
For example, if you want to transfer your bitcoins, you will have to click on “Withdraw” as shown below. A new page will open on Binance, which will ask you for three things:
– The public address called “recipient address” to which the cryptocurrencies will be transferred (this is your public address you will find out soon)
– Cloud Network (here, Bitcoin will be for the Bitcoin cryptocurrency)
– The amount of cryptocurrency you want to transfer (BTC)
Leave this page open without filling it out and open your Ledger Live to retrieve the public address you want to transfer your cryptocurrencies to.
- Get your address from Ledger
First, launch your Ledger Wallet and connect to Ledger Live in parallel. In Ledger Live, go to the Receive tab, select the ledger account you’ve already created (step 1 of the tutorial), and click Continue.
Here we have selected the previously created “Bitcoin 1” account.

A new window will appear allowing you to discover a public address associated with your “Bitcoin 1” account.
Before returning to the Binance page, you will have to follow the exact Ledger procedure here, with two main steps:
– You will first have to verify that the public address associated with your “Bitcoin 1” account on Ledger Live matches the public address in your Ledger wallet
– Next, copy this public address by clicking on the icon to the right of the address (the goal is then to “paste” it into the “Recipient Address” box on Binance)
Then validate the matching public address on Ledger Live and your key
- Return to Binance to make a withdrawal
Now that you’re back on your Binance page, there are only 4 small steps left:
1. Paste the public address into the Address box (make sure it matches your ledger address, a simple badly pasted copy could be hacked and you’ll find yourself pasting the attacker’s public address).
2. Once the address is registered, Binance should automatically detect the network through which the transfer will be made, in this case the Bitcoin blockchain.
3. Enter the amount you wish to transfer. While you are transferring cryptocurrencies, you will have to give the amount in cryptocurrencies.
For example: During today’s bitcoins, if you want to transfer about 33€, you will have to enter 0.002 bitcoins in the amount box. With this amount, Binance will remove the “network fee” (0.0002 bitcoins fixed on the Bitcoin blockchain, about 3.2 euros), so the amount you will transfer will be 0.002 bitcoins – 0.0002 bitcoins = 0.0018 bitcoins (about 30 euros)
4. Press “Withdraw”
5. After validating the 2FA procedure on Binance, your transaction will be executed. You will have to wait a few minutes before seeing the amount transferred to Ledger.
Voila, you made your first transfer from Binance to Ledger!
Commentaires
Enregistrer un commentaire